A dripping ceiling is more than just an annoyance – it's a sign of a potential underlying problem in your home's plumbing or roof. Left unchecked, a ceiling leak can lead to serious damage, including mold growth, structural issues, and even electrical hazards.
The good news is that with prompt action and a little DIY know-how, you can often tackle smaller ceiling leaks yourself. This guide will walk you through the process of identifying the source of the leak, containing the damage, and repairing the affected area in your ceiling. However, for larger leaks or those requiring professional expertise in plumbing or roofing, calling in the professionals is always recommended.
Here's what you'll need to know:
- Safety First: Before diving into repairs, ensure your safety. Turn off the power to the affected area if there's a chance of electrical wiring being compromised. Wear protective gear like gloves, goggles, and a dust mask when dealing with debris and mold.
- Gathering Supplies: Equip yourself with the necessary tools depending on the severity of the leak and the repair approach. We'll list specific tools needed in each step below.
Identifying the Leak Source:
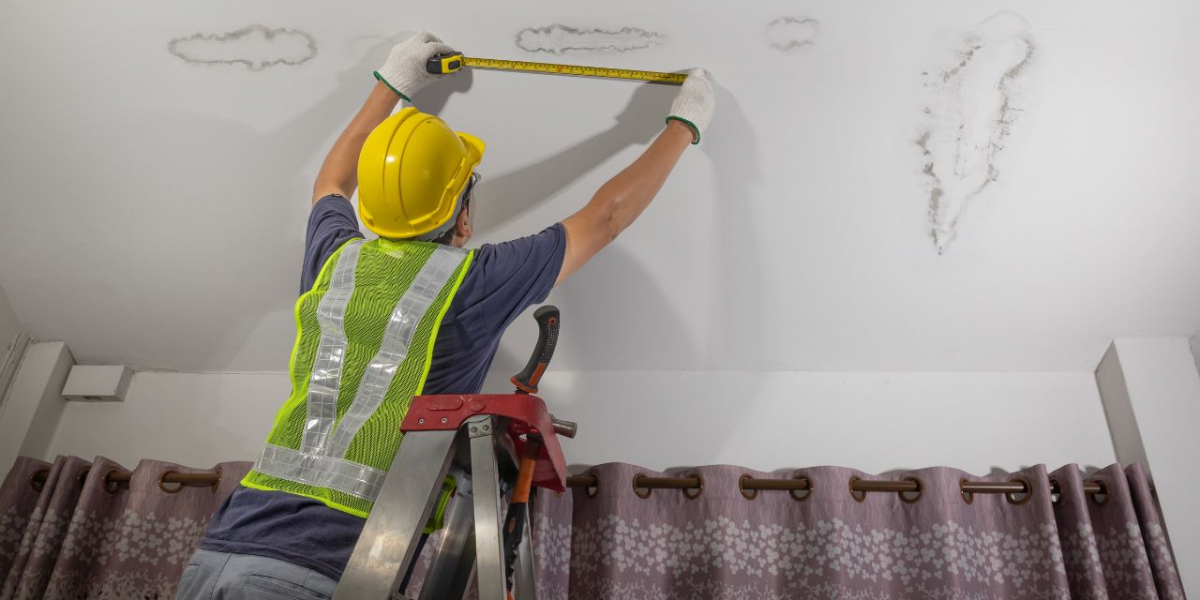
- Water Stains and Clues: The first step is to locate the source of the leak. Look for water stains, warping, or peeling paint on your ceiling. These signs will often point you directly to the leak's origin. Additionally, listen for dripping sounds above the ceiling, especially after heavy rain if you suspect a roof leak.
- Following the Trail: Leaks can sometimes travel through walls or ceilings before becoming visible. If the leak source isn' t immediately apparent, follow the water stains or dampness to its potential starting point. This might involve checking your upper floor bathrooms, attics, or even neighboring rooms.
Containing the Damage:
- Contain Falling Water: Once you've identified the leak's general location, act quickly to prevent further damage. Place a bucket or waterproof container directly under the leak to catch dripping water. Consider lining the bucket with a towel or tarp to prevent splashing.
- Protect Your Belongings: Move furniture and belongings away from the affected area to avoid water damage. If furniture can't be moved, cover it with plastic sheeting or tarps.
Addressing the Leak (DIY Options):
Small Leak in Drywall Ceiling:
Tools you'll need:
- Utility knife or drywall saw
- Flathead screwdriver
- Stud finder (optional)
- Sandpaper
- Drop cloths
- Spray bottle
- Spackle knife
- Spackle compound
- Joint tape (mesh or paper)
- Sandpaper (various grits)
- Primer
- Paint (optional)
- Drain the Leak: Using a flathead screwdriver, carefully poke a small hole in the center of the most water-damaged area on the ceiling. Make sure a bucket is positioned underneath to catch the draining water.
- Cut Away Damaged Drywall: Once the water has drained, use a utility knife or drywall saw to cut away the damaged section of the ceiling. Aim to cut a square or rectangular shape with clean edges, extending slightly beyond the visible water damage. A stud finder can help you avoid cutting into any structural elements.
- Drying Out the Area: Allow the exposed area above the ceiling to dry completely for several days. You can encourage drying by using a fan pointed at the opening. Ensure proper ventilation in the room to prevent moisture build-up.
- Repairing the Drywall: Once the area is thoroughly dry, measure and cut a piece of replacement drywall to fit the opening. Secure the new drywall patch using drywall screws, ensuring it's flush with the surrounding ceiling.
- Finishing Touches: Apply joint tape over the seams and screw holes to create a smooth surface. Apply several thin coats of spackle compound, allowing each layer to dry completely before sanding smooth. Finally, prime and paint the repaired area to match the rest of your ceiling (painting is optional).
If you're dealing with water damage or unsightly stains on your ceiling, Allseal Waterproofing offers a reliable ceiling leakage repair service in Singapore. Ceiling leaks can cause significant structural damage and lead to mold growth if not addressed promptly. Our team specializes in identifying the source of the leak and providing long-lasting solutions.
Using advanced detection methods and high-quality materials, we ensure that your ceiling is repaired and fully protected from future leaks. Whether the issue is caused by roof damage, plumbing leaks, or other water-related problems, our ceiling leakage repair service in Singapore delivers efficient and professional results. Contact Allseal Waterproofing today to safeguard your home or office from water damage.
Important Note: This approach is suitable for small leaks in drywall ceilings. For larger leaks, leaks in other ceiling materials like plaster, or leaks that require addressing the source itself (e.g., plumbing repair), consulting a professional is highly recommended.
Calling in the Professionals:
There are several situations where seeking professional help is crucial:
- Extensive Leak Damage: If the leak has caused significant damage to your ceiling, it's best to call in a contractor or restoration company. They can assess the full extent of the damage, repair the source of the leak, and perform any necessary structural repairs.
- Mold Growth: If you suspect mold growth due to the leak, don't attempt to handle it yourself. Mold can pose health risks, and professional remediation services are equipped to safely remove and prevent mold growth.
- Complex Plumbing or Roofing Issues: If the leak is caused by a complex plumbing or roofing problem, a professional can diagnose and address the root cause effectively.
Conclusion:
A ceiling leak can be a frustrating and potentially costly issue. However, by following the steps outlined in this guide, you can often address smaller leaks yourself and prevent further damage. Remember to prioritize safety and don't hesitate to call in professionals for larger leaks or complex situations. By taking prompt action, you can restore your ceiling's integrity and peace of mind in your home.